Welcome to the fifth installment of The Noob’s Guide to Twython, where we’re playing around with the Twitter API with Python, using the Twython module. These tutorials are aimed at those who are perhaps learning to code for the first time, or have only a beginner’s knowledge of Python. If you’re looking for some advanced stuff, you’ve come to the wrong place!
This tutorial assumes that you already know how to set up your Twython for the first time!
What was the very first thing we learnt as a Twython noob? Whether you’ve been following this tutorial from the beginning or not, it probably was how to update your status.
twitter.update_status(status="Hello world.")
Remember how proud you were of those two simple words? Let’s try to recreate that momentous feeling of pride, but now by updating your Twitter status with your very own custom image!
This is going to be a pretty basic tutorial where we will learn to create a random image generator for Twitter. But using our knowledge from the past tutorials, and the wonders of our own creative imaginations, it’s easy to expand on this simple bit of example code to go off into the Twitterverse and create your own picture-sharing Twitter bot.
Editing Images for your Twitter Status with PIL
So, as always, before you dive in, let’s see what you’re getting into so there’s no surprises. Then we can break it down into noob-sized chunks.
# I'll explain glob and PIL in a moment =]
from twython import Twython, TwythonError
import glob
import random
from PIL import Image, ImageDraw, ImageFont

app_key = "YOUR_APP_KEY"
app_secret = "YOUR_APP_SECRET"
oauth_token = "YOUR_OAUTH_TOKEN"
oauth_token_secret = "YOUR_OAUTH_TOKEN_SECRET"

twitter = Twython(app_key,app_secret,oauth_token,oauth_token_secret)

# Telling Twython where to look for image files
images = glob.glob("images/*")

# Check if there are any files in the images directory
if len(images) > 0:
    # Request user input for text to add to image
    message = raw_input("Text: ")
    # Request user input for new Twitter status to Tweet
    new_status = raw_input("Update Twitter Status: ")
    # Open random image from our directory
    random_image = Image.open(images[random.randint(0,len(images))-1])
    # Twitter displays images at 440px width
    Width = 440
    # Calculate size difference between original and 440px
    width_percent = (Width/float(random_image.size[0]))
    # Use that percentage to determine the new height to resize
    Height = int((float(random_image.size[1])*float(width_percent)))
    # Resize image to optimal Twitter size
    random_image = random_image.resize((Width,Height), Image.BILINEAR)
    # Open the image for drawing
    draw_image = ImageDraw.Draw(random_image)
    # Getting the size of our message text
    width, height = draw_image.textsize(message)
    # Setting a funky new font for our message
    font = ImageFont.truetype("resources/cool-font.ttf",50)
    # Drawing the text onto the image
    draw_image.text((20,(Height-height)/2),message,(255,255,255),font=font)
    # Saving the image as tweetpic.jpg
    random_image.save("tweetpic.jpg")
    # Opening up the saved image
    tweetpic = open("tweetpic.jpg","rb")
    # Update status with our new image and status!
    twitter.update_status_with_media(status=new_status, media=tweetpic)
# Unless there's no images in the images directory...
else:
    print "There are no images in that folder."
It doesn’t look like much, but there’s lots of brand new things we haven’t covered yet.
Before anything else though, you have to check to see whether you have glob and PIL installed. You can do this from the IDLE just by trying to import PIL and glob.
>>> import glob
>>> import PIL
If it’s saying that you don’t have either of those installed, well guess what, you’re going to have to install them.
If you run Windows, thankfully there are Pillow installers you can download from here so you don’t have to compile it yourself. (That webpage also provides installation instructions for other operating systems too!) Make sure that when you install Pillow (the far more usable Python Imaging Library fork) you download the correct the .exe file for your Windows system and Python version.
You probably want to know what PIL and glob are, huh?
glob is a Python module which makes finding file pathways and stuff a little easier. There are multiple ways you can set file pathways, but glob is simple to use and you don’t need to get all heavy into regex for very basic pattern matching.
PIL (Python Imaging Library) is becoming a little deprecated now, but there’s a fork called Pillow that works pretty much exactly the same code-wise, but is a lot more “friendly”. Using PIL, you can create images, edit images, etc. I mean, don’t get me wrong, it’s no Photoshop but for quick and simple image edits like adding watermarks or text to image, it’s all we need!
Breaking Down The Code…
Firstly, in your working directory (the directory which the program you’re working on is saved), you’re going to need to create two folders: one called images and one called resources.
![]()
In the images folder, you can save all of your images that you want to edit and Tweet out in there.
For this example, I’ve just downloaded some random images from Google Image Search to our images folder.
In resources, you can save any fonts or other resources you may want to use. For this example, I’ll be using a font which we’re just going to call cool-font.ttf. You can find loads of font files and stuff on Da Font or other font download websites.
So let’s get started!
images = glob.glob("images/*")
Let’s create a variable called images to tell Twython where to look for our image files. Using glob, we can direct Twython to look for any file in the images folder (so it’s important to only save image files to this folder). The asterisk (*) generally tends to mean wildcard, as in anything. glob returns us a list of all the files within that folder. So it’s like saying images = [“images/pic1.jpg”, “images/pic2.jpg”, “images/etc.jpg”]…
if len(images) > 0:
Here we are telling Twython to perform the following instructions if the length of our list of images is more than 0, as in if there’s actually files in that folder.
message = raw_input("Text: ")
new_status = raw_input("Update Twitter Status: ")
When the program is executed, it will prompt the user for Text input. The user’s input from this prompt will be saved as a string to message. This is the text that we’re going to add to our image.
Once something’s been entered, the program will again prompt the user for input, asking for the new status to update to Twitter. Again, the user’s new status will get saved as a string to new_status.
random_image = Image.open(images[random.randint(0,len(images))-1])
Now we’re calling on PIL’s Image module to open a random file from the images folder. Remember how we said that the images variable is just a list of images? So we can use Python’s random module to select a random item from the list by randomly selecting a number within the the list’s index (between 0 and the length of the images list, or how many files in the folder, and then subtracting 1 from the random integer as indexes start from 0).
Width = 440
width_percent = (Width/float(random_image.size[0]))
Next we want to set the Width of the image as 440px. This is because Twitter’s optimal image width is 440px. Twitter’s optimal image height is 220px, which is all that’s displayed in the Twitter feed without the user clicking on Expand to see the full image. But the width is certainly the most important. We can use larger images and Twitter will scale them down. But if we use a large image, then add text to it, then have Twitter scale it down for us, what’s going to happen? The text is going to be smaller than how we want it to be! So we need to resize the image before we add the text. Right now though, we’re just saving the 440 for later use as we’re going to need it again.
But then how do we get the height of the image for when we resize? Images are going to have different widths and heights! Well, we need to have our program figure out what height we’re going to need to resize the image to, according to the given width of 440px. We can do this by getting the float (non-integer basically) of our image’s original width (the first item that comes up for the size[] is width) and dividing it by our new Width of 440px. That’s our percentage change in width size – or width_percent.
So next, we’ll want to use that width_percent to determine our new Height.
Height = int((float(random_image.size[1])*float(width_percent)))
random_image = random_image.resize((Width,Height), Image.BILINEAR)
Of course, we need our new Height to be an integer so we enclose our code to return us the height once we work it out in int(). To get the height, we’ll need to use the same bit of code we used last time to get the original width, to get the original height – (float(random_image.size[1]). As you can see, we’re using the index of 1 instead of 0, as now we’re going for height and not width. Then we’re going to multiply our original height by the float of our width percentage difference or width_percent. So really we’re just doing the exact same thing that we did to convert our original width to 440px.
Yay for basic maths!
So now we have our new Width and Height we can change our existing random_image variable to our new resized image. So we get our existing random_image and resize it by our new Width and Height. The Image.BILINEAR parameter is just a method of image scaling in mathematics. There are other scaling methods that you can play around with on your own.
draw_image = ImageDraw.Draw(random_image)
width, height = draw_image.textsize(message)
font = ImageFont.truetype("resources/cool-font.ttf",50)
draw_image.text((20,(Height-height)/2),message,(255,255,255),font=font)
random_image.save("tweetpic.jpg")
Now that we have our resized image, we want to open it up for drawing and call it draw_image.
We can get the width and height of the message fromraw_input earlier to determine the placement of the message within the image. We’ll call these width and height in all lower caps so we can differentiate from the image Width and Height where we capitalised the first letter. Notice how instead of .size() we’re using .textsize() now.
We can choose our own font for the message overlay, by using the Image.Font module and using the truetype font (.ttf) saved in our resources folder. In this example, we’re setting out font size to 50, but obviously you can play around with this to find your own optimal font size for whatever your message is. We’ll save our font settings as font.
Next we’re going to draw the text onto our image by using .text(). The first parameter (20, (Height-height)/2) gives us the coordinates for where to add the text to the image. For this example, I’ve combined two different ways in which to do this. On the x coordinate, we’re adding our text 20px from the left. On the y coordinate, we’ve done something a little different. We’re working out the centre-height of the image by subtracting the text’s height from the image height and dividing that figure by 2.
The second parameter message is whatever the user inputted as their message to be added to the image. The third parameter the font colour we want in RGB, so (255,255,255) gives us white. And finally, the last parameter is setting our font to the font that we’ve already defined.
That’s all the image editing done, so now we can save our edited random_image as tweetpic.jpg! This will either create the file tweetpic.jpg as new or, if the image already exists within the working directory from previously running this program, it will replace the existing tweetpic.jpg. So once the image is created and you’ve Tweeted it out, you don’t have to delete the new file from your computer.
width, height = draw_image.textsize(message)
font = ImageFont.truetype("resources/cool-font.ttf",50)
draw_image.text((20,(Height-height)/2),message,(255,255,255),font=font)
random_image.save("tweetpic.jpg")
And last but not least, the moment you’ve all been waiting for…
tweetpic = open("tweetpic.jpg","rb")
twitter.update_status_with_media(status=new_status, media=tweetpic)
We open up our new tweetpic.jpg so we can Tweet it. “rb” stands for Read Binary which is how we want to open the file for our program to read.
Then we call Twython to update_status_with_media using the new_status that we prompted our user for at the beginning, and attaching our tweetpic!
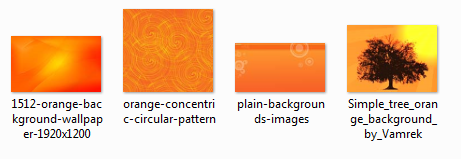
Now let’s run our new image editing Twitter bot!

And what do we get…?
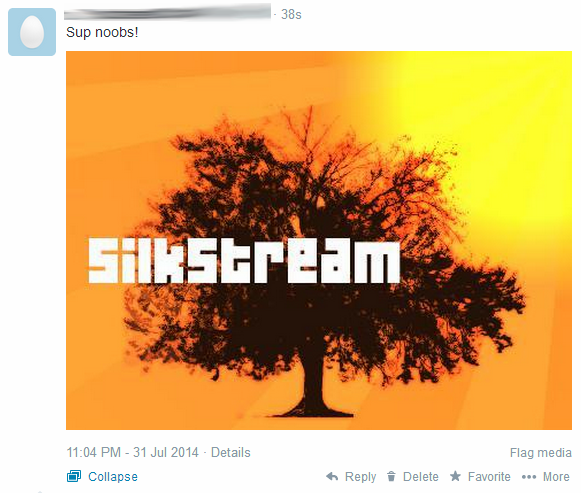
Awesome.
I thought this image in particular looked quite cool:

So what else can we do with our new Twitter bot?
The sky’s the limit really, you just need a little imagination. You can create amazing tools based off of this simple little program.
- You could upload all your company photos and Tweet them out randomly with your company name as a watermark in the corner of the images.
- You could create a list of different motivational quotes, and have them Tweeted out randomly and embedded onto a random motivational image, deleting each quote and each image after it’s used, creating a unique motivational image generator. You could even style it to be in the same format as the motivational poster memes. In fact, you could just create uniquely generated memes and to heck with motivational!
- Get a cool folder of different backgrounds and have a random fact or tip Tweeted out multiple times a day related to your company industry. Check out one of our previous posts “Random Tweets with Twython” for help on how to Tweet random quotes or messages!
- You could have the program listen out for a specific hashtag and respond to the Tweet within the image. For example, you could create a branded hashtag like #PicMePlz and so people could Tweet:
“Content is King” – Bill Gates, 1996 http://imgsite.com/billgates.jpg #PicMePlz
and then your program goes off and downloads the image from the specific website, resizes it and adds “Content is King” – Bill Gates, 1996 to the top or bottom of the image. Then replies to the user with:
For @TwitterUser: “Content is King” – Bill Gates, 1996 #PicMePlz
with their image attached.
Whatever you use this code tutorial for, have fun and don’t forget to share with your code creations with us on Twitter @Silkstreamnet!
Your final code should look like this:
from twython import Twython, TwythonError
import glob
import random
from PIL import Image, ImageDraw, ImageFont

app_key = "YOUR_APP_KEY"
app_secret = "YOUR_APP_SECRET"
oauth_token = "YOUR_OAUTH_TOKEN"
oauth_token_secret = "YOUR_OAUTH_TOKEN_SECRET"

twitter = Twython(app_key,app_secret,oauth_token,oauth_token_secret)

images = glob.glob("images/*")

if len(images) > 0:
    message = raw_input("Text: ")
    new_status = raw_input("Update Twitter Status: ")
    random_image = Image.open(images[random.randint(0,len(images))-1])
    Width = 440
    width_percent = (Width/float(random_image.size[0]))
    Height = int((float(random_image.size[1])*float(width_percent)))
    random_image = random_image.resize((Width,Height), Image.BILINEAR)
    draw_image = ImageDraw.Draw(random_image)
    width, height = draw_image.textsize(message)
    font = ImageFont.truetype("resources/cool-font.ttf",50)
    draw_image.text((20,(Height-height)/2),message,(255,255,255),font=font)
    random_image.save("tweetpic.jpg")
    tweetpic = open("tweetpic.jpg","rb")
    twitter.update_status_with_media(status=new_status, media=tweetpic)
else:
    print "There are no images in that folder."
The Noob’s Guide to Twython – Part 5:
Playing with Followers with Twython
The Noob’s Guide to Twython – Part 6:
Coming Soon!
I really like your guide! Can you make a Tut for a script that favorites and RTs every tweet from his following accounts(the accs that the bot follows)?
Would be awesome
I could certainly give that a go for you! :D
i love your guide! <3 But i have a problem, I want to do a search for a region and that result, to mention a random person with a comment, would it be possible to do that with twython?
You can indeed with Twython do a user search by location and then perhaps store all those users within a text file, database or list, and return a random user to insert into your tweet. I’ll try and write a tutorial for this at some point, but I’m afraid it probably wouldn’t be written for you as quickly as you would need it. I would suggest Googling for user search using Twitter API and apply it to Twython. Might get better results than Googling for user search using Twython.\n\nGood luck!
Like this. How can i write a randomly selected text from a list on a picture? Or how to combine this with part 3 of your tutorial?
Hi PiJoe,\n\nFor a second there, I thought you wanted to pull the embedded text from an image. I panicked haha.\n\nIt should be easy enough though to combine Guide #3 with Guide #5:\n\nFirstly you wouldn’t need the:\n
message = raw_input("Text: ")\n new_status = raw_input("Update Twitter Status: ")\nas you will already be retrieving your status message from a list.\n\nSo you can replace this with a snippet from Guide #3:\ntoTweet = list[random.randint(0,len(list))-1]\n\nwith your list above the main program loop.\n\nThen in your program where you see:\ntwitter.update_status_with_media(status=new_status, media=tweetpic)\nyou’ll just want to replace new_status with toTweet or whatever you’re calling these if you’re using different variable names.\n\nWith longer pieces of text, you’re probably going to want to wrap the text over multiple lines too, so the text isn’t just displayed in a single line going off of the image. If you find this is the case, look into the “textwrap” module.\n\nHope that’s helped and good luck!Thank you very much. Yes that will help me a lot. Will give it a try later that night.
SO just tried it. GOt this error:\n\nTraceback (most recent call last):\n File “qpicture.py”, line 29, in \n font = ImageFont.truetype(“resources/cool-font.ttf”,50)\n File “/usr/lib/python2.7/dist-packages/PIL/ImageFont.py”, line 218, in truetype\n return FreeTypeFont(filename, size, index, encoding)\n File “/usr/lib/python2.7/dist-packages/PIL/ImageFont.py”, line 134, in __init__\n self.font = core.getfont(file, size, index, encoding)\nIOError: cannot open resource
I moved and renamed a font to cool-font.ttf within the resources directory for sake of example. You can use any font of your choosing in its place. Is the font you are using cool-font.tff? Not that it’s even necessary to specify a font at all, but it does add a satisfying touch.
If you still get IOError though, try replacing the line with this:
fonts_path = os.path.join(os.path.dirname(os.path.dirname(__file__)), "resources")

font = ImageFont.truetype(os.path.join(fonts_path, "YourFont.ttf"), 50)
Replacing YourFont.ttf with the filename of your chosen font, and 50 with whatever size you would like your font – this may take a little experimentation to find the perfect size.
Hey again.
I have a problem. Python is saying this:
Traceback (most recent call last):
File “/home/pi/Desktop/Twitter Bot/Twitter Bot_ Edited Images.py”, line 7, in
from PIL import Image, ImageDraw, ImageFont
ImportError: No module named PIL
How do i get PIL in?
Hi Kieran,
Hopefully this will help you install PIL on your Pi :)
https://www.pkimber.net/howto/python/modules/pillow.html
Try:
sudo apt-get install libjpeg62-dev
sudo apt-get install zlib1g-dev
sudo apt-get install libfreetype6-dev
sudo apt-get install liblcms1-dev
pip install pillow
You may also need to try:
sudo apt-get install python-dev python-setuptools
Good luck!
Hi there.
First I’d like to say that I really like your guides. There don’t seem to be very many detailed guides on using Twython.
I was wondering if you might have any ideas on how I could go about doing something. I have Twython configured and perfectly able to post tweets, but I’m trying to find a way to have it post things that I didn’t type directly into the command line. I’ve thought of two ways I might be able to do this, but honestly I have no idea if either of them are possible.
The first thing I was thinking of is perhaps it could tweet anything that it receives as a direct message, minus the person’s name who sent it. For example, if I sent it a direct message that says “Hello”, it would post a tweet that says “hello”.
The second thing I was thinking of is if that wasn’t possible, would it be possible for me to create a webpage with a text field, and whatever is typed and submitted in that field is what the bot posts. Again, I don’t know if this would be possible at all. My webserver just hosts a few html files and a php contact form.
I know this is a very specific thing I want to do, so I know there won’t be a guide on anything similar, but I was just wondering if maybe you had any advice or ideas on a place to get started. I’m done rambling now.
Thanks again for your guides.
Hi Jim,\n\nThank you for your comment :)\n\nThis is possible. I haven’t played around with DM functions yet, but you would basically be checking for new DMs constantly and when the bot finds one it stores the latest DM as a variable and Tweets it. To ensure it doesn’t just Tweet the last DM over and over again until there’s a new one, you would have to check the latest DM against the stored variable, and if it’s the same – don’t tweet. That would be the logic at least.\n\nAs for the text box, I’ve played around with Twython on webpages quite successfully but I found the easiest way to do this was by using the Django framework due to the python. I recommend Digital Ocean for dirt cheap VPS’ preloaded with Django. You could then have a webpage with a textbox, type your tweet in and press “Tweet” or “Send or whatever”. Depending on your host, installing Twython and all the bits can be difficult. Which is why I recommend Digital Ocean, for its price and because you have choice and full access to the OS to do whatever you want.\n\nCan I ask what you want this sort of thing for? Just so you can tweet from another account without having to log in?
Hello.
Thanks a lot for your response. Yes, that’s basically all I’m trying to do. I just need a way to tweet from the account, without switching. I have a VPS with Linode, and I’ll give django a look and see what I can do.
Seems a bit overcomplicated to write a program to tweet from a different account for you. Using the Twitter mobile app, you can be logged into up to 5 different accounts simultaneously. But each to their own haha. Good luck! :)
Hi,
First of all congratulations and thanks for this wonderful tutorial, I’ll appreciate if you can help with a issue, I already now how get_mention_timeline and GET statuses/mentions_timeline, but the problem I don’t how to “extract” only the tweet and de username or display name or anything from the result of that instance.
for example, I have this:
api = Twython(apiKey,apiSecret,accessToken,accessTokenSecret)
get_tweet = api.get_mentions_timeline(count=1,contributor_details='true')
if I sent to print “get_tweet”, I can see in the console all the information of the tweet in some kind of list or array, but I want to get only the username and display name :S can you help me?
I am really new using python and all of it :S
greetings
Hi Carlos.
Try
print get_tweet["text"]

print get_tweet["name"]

print get_tweet["screen_name"]
Have a look at https://dev.twitter.com/rest/reference/get/statuses/mentions_timeline to see all the info you can extract from the get_mention_timeline tweets.
Hope this has helped. I haven’t tried the above out, but it should work. Let me know if it doesn’t!
Thank you so much for your help! I tried but it return the following error:
print get_tweet["text"]

TypeError: list indices must be integers, not str