Google Blogger, or Blogspot as its also known, is a free blogging platform provided by Google. Many people choose to use Google Blogger simply because its much easier than WordPress to make adjustments to your blog if you have little coding experience.
There are many widgets you can browse and install on your Google Blogger blog to help “pimp it up” a little and give it a personal touch. But what Blogger does seem to be sorely lacking at the moment, is a decent widget to assign Google Authorship to not only your posts, but all other contributors to your site.
Most of us know that to set up Google Authorship we need to link our Google Plus page to our posts, but there are a lack of widgets enabling us to do this easily. This article is intended to guide you through the process of adding the correct code to your Blogger blogs HTML template in order to create multiple author biographies with Google Authorship, which should take the stress away of adding it manually every time you publish a post.
Step 1: Adding Your Authors

Adding more authors as contributors to your blog is a simple process. Under the basic settings tab you will notice a permissions box, like the one pictured above. Simply click on the “+ Add authors” link and type their Gmail address. They will be sent a request by email which they will need to confirm. Once they have, their name and email address will be displayed here. You should take note of the full name listed here as you will need this later.
Step 2: Adding An Author Bio Box
Some Blogger templates, particularly the more newly developed ones, already include an author bio box. Sora Templates make some really nice dynamic themes for blogs, I’d recommend checking them out if you’re looking for something professional rather than personal. Here is an example of the generic author box you can expect from one of these templates.
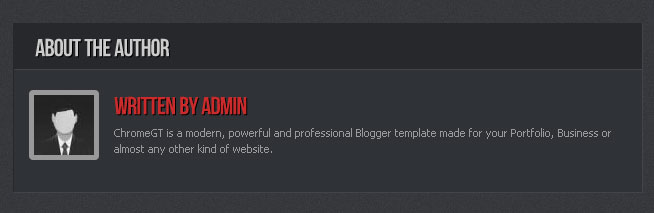
The biggest problem that I encountered was that the Author Bio box was only suitable for one author. In other words, if one of my contributors posted an article they would generate the same author box at the bottom of their article. Which isn’t a desirable outcome for blogs that run multiple authors regularly.
To personalise this you will need to make some changes to your blogs HTML code. I always recommend taking a backup of your site before making any changes to your blogs code, just to be safe. Once you’ve done that, open up your HTML and hit [CTRL+A] to select the code and [CTRL+C] to copy. Now paste this into notepad. To find the code for the author box, hit [CTRL+F] and in this instance type “About the Author” to locate the code you need within the HTML.
The code I found looks like this:
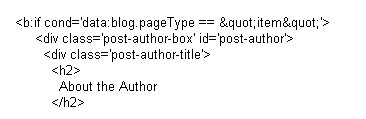
I only want this author bio to be displayed when I post an article myself so I need to add an extra line between the first and third that tells Blogger “Hey this bio is about me!”:
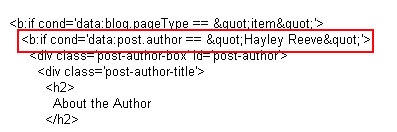
I can then edit the rest of the author box and personalise. Don’t forget to close this line with a </b:if> at the end of author box code.
So here’s my finished author bio:

Step 3: Introducing Multiple Authors to Your HTML code
Now we have added the extra line of code that establishes which posts an individual has written, we can repeat the process for multiple authors by adding further code to the HTML.
Cut and paste the whole author box HTML underneath the first and repeat the process using the exact name of the new author as it is displayed in your settings in step 1.
So here’s the code for my colleague Randal’s author box:

Again, don’t forget to close this new line with a corresponding </b:if> command. Here is his finished author bio:

Step 4: Assigning Google Authorship
The easiest way to assign Google Authorship to each contributor is to place a link to their Google Plus profile within each individual author bio. I did this by repeating the authors name and linking out in the following way:

The corresponding Google Plus profile should also link back to your blog in the “contributor to” section.
So that’s it. If you have any questions about this process or if you found this tutorial helpful let me know in the comments below.
Great and useful post – thanks.
nice post…….thanks for sharing
Hello Hayley, could you pls tell me how to add a link with recent posts by author, just like yours in my blogspot?
I will came back here to see the answer.
tks a lot
Hi Tin, There is no direct way to do this through blogger. I’ll try to write an article that shows you how to implement this through your HTML.
Hi! Is it possible to edit the html of the template to do recognize a contributer within a post? Like a simple “posted by Author A on XX/XX/XXXX” or “posted by Author T on YY/YY/YYYY?”
Hi Nigel, I wouldn’t recommend editing the HTML to do this directly. This post walks you through all the steps needed to achieve this result. You can add as many different authors /w author box as needed. Each time they log-in and post an article, Blogger will generate this for them using the code provided in the above steps.
Very useful. I’ll give this a try. I can see you’re a real person on Google+ too so that’s relieving.
Thanks for the Follow!